Showing posts with label Cousins. Show all posts

Sunday, February 26, 2012

#640 - watercolor with vinyl letters

Ironically, I didn't really "think outside the box" to make this...or maybe I did...I don't know.  At least I didn't think outside the box for the quote :)

Basically, I took some vinyl letters I had and put them on some nice (read: thick) water color paper.  Then I gave the boys some water colors and they loved it.  
 We also did their cousins' names.
 Here's what they looked like before we took the vinyl letters off.

 And the finished projects...


Tuesday, July 19, 2011

#612 - only thing better than butter

I'm still trying to finish remodeling my kitchen, but in the meantime, I thought I'd share my favorite (food) quote that I recently put up in out kitchen.  It is right above my toaster and blender where 99% of our butter gets used.
The wall behind it used to be fake white brick wallpaper,  but I painted it with black chalkboard paint and added these vinyl letters.

I'll probably change it around, but in the meantime, I love looking at my favorite quote.  Maybe some day I'll make a print of it with brown/yellow colors (think toast and butter, not the other way those colors go together)...

And seriously, the only thing better than butter is more butter!  Sounds like a Paula Dean quote, but it's actually from my cousin Peter (although, I don't know if he remembers saying it.)  It's also a quote from a bakery in Chicago.

Thursday, August 26, 2010

#480 - The Bib Awards - "what's the best bib?"

Most Stylish Bib with a Handmade Touch - Homemade Bibs From My Cousin Lizzy
(Lizzy, you are so talented, you should open an Etsy shop)
Oster loves wearing these bibs around the house, no need to be eating.  They are also asorbant, so they catch the spills.

Best Bib for Overall Coverage and Easy Clean Up - Dex Dura from Walmart 
(not a fan of Walmart, but this bib was only $4-$5 there)
 I first heard about this bib from her.  I love how it catches everything, including liquids.  I usually just wipe it down or throw the bib in the washer and let it air dry.

Best Bib To Get Your Kid To Eat 
or Most High Tech Bib 
Pepe bought this bib recently to get Oster to eat more...it's helped!  
It really lights up and the jet spoon even has flashing lights.  
Con - way too small and doesn't catch any of the food.

Best Message Bib - I Love Mommy and I Love Daddy Bibs from my mom
Can't get any better message than that?!
It's the perfect size for Parker and it soaks up all his slober.
The "I Love Mommy" bib was in the wash, I guess I use that one just a tad more :)
What about you?  Do you have a favorite bib?  What works best?

I really like this bib tutorial for a waterproof catch all bib.

Sunday, June 27, 2010

#442 - cousins

There are so many things I love about this photo!
 
~there is a 6 year age difference between these 2
~but Makena treats Oster like a friend/playmate, she watches out for him and plays with him!
 
~I love these 2 chairs...the wood one is from a thrift store (only $4) and the red one is from Pepe's grandparents

~And isn't Makena's shirt cute...love the yellow stripes

Thanks Makena for being such a great cousin to Oster!

Saturday, March 13, 2010

#346 - bibs for a runny nose


Baby O has never liked bibs until recently. He wears them around the house/outside...sort of cute.

One day he was wearing one when he had a running nose and it dawned on me...(cue light-bulb) If your kid is ever sick, have them wear a bib so they can wipe their nose or you can wipe it real quick. (You probably already knew this.) It saves on kleenex ('cause I can never find one when I need one), time and the sleeves of their shirts & my clothes.

It's now a habit in our house.

Notice the cute red/white/blue bib in the upper right hand corner (wish I had a better pic)...my cousin Liz made it...so stylish.

And the bottom bib with red stains...Baby O bit his tongue...ouch...glad he was wearing a bib b/c of his snotty nose.

Thursday, March 11, 2010

#344 - kitchen backsplash fix

BEFORE

AFTER

SIDE BY SIDE

Before we moved into our house, we had to install a new counter top and bottom cabinets (they were rotted out) in our kitchen. We did it on the cheap because we eventually wanted to either tear down this house (I don't think that will ever happen) or do a more intensive remodel on our kitchen.

We were left with this ugly wall/backsplash (see BEFORE PHOTO), since our new counter top wasn't high enough. Our kitchen remodel is no where in site, so I decided to take matters into my own hands. Here's what I did:

Cut out pictures from my 2008 Eating Well Calendar (seriously gorgeous photos)
Famed them in some inexpensive picture frames from Target
Rested them on top of the counter (I didn't even hang on the wall)

That's it...hides that nasty gap between the wallpaper & counter and makes our kitchen much cheerier!

More details about the photo above:
~Food in photos from L-R: kiwi, orange, cucumber, raspberry/blueberry, tomato, chilis (out of photo)
~Notice the dishwashing liquid in the olive oil bottle - isn't that fancy? I learned that from my cousin Michelle...who I think learned it from Martha.
~Also, notice Baby O's silver cup (on the right side)? He got it from my parents and he loves to drink out of it.

Monday, September 7, 2009

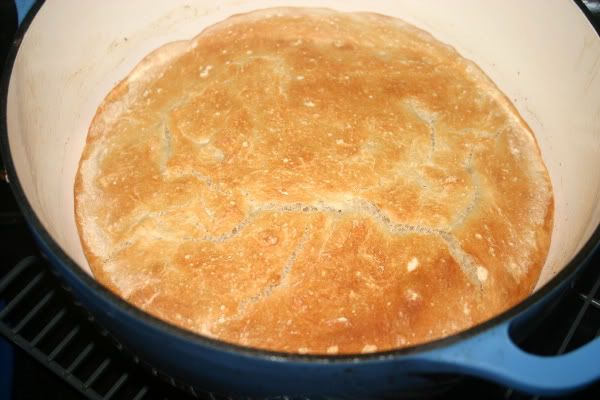
#217 - Artisan Bread


My cousin Matt came and taught us how to make Artisan Bread. We used this recipe from my cousin Michelle (Matt's sister). We baked it in the Dutch Oven Pepe got for Father's Day.

Formula and process created by Jim Lahey, owner of Sullivan St Bakery.

formula
3 cups (430g) flour
11⁄2 cups (345g or 12oz) water
1⁄4 teaspoon (1g) yeast
11⁄4 teaspoon (8g) salt
olive oil (for coating)
extra flour, wheat bran, or cornmeal (for dusting)

equipment
Two medium mixing bowls
6 to 8 quart pot with lid
(Pyrex glass, Le Creuset cast iron, or ceramic)
Wooden Spoon or spatula (optional)
Plastic wrap
Two or three cotton dish towels (not terrycloth)

process
Mix all of the dry ingredients in a medium bowl. Add water and incorporate by hand or with a wooden spoon or spatula for 30 seconds to 1 minute. Lightly coat the inside of a second medium bowl with olive oil and place the dough in the bowl. Cover the bowl with plastic wrap and let the dough rest 12 hours at room temperature (approx. 65-72°F).

Remove the dough from the bowl and fold once or twice. Let the dough rest 15 minutes in the bowl or on the work surface. next, shape the dough into ball. Generously coat a cotton towel with flour, wheat bran, or cornmeal; place the dough seam side down on the towel and dust with flour. Cover the dough with a cotton towel and let rise 1-2 hours at room temperature, until more than doubled in size.

Preheat oven to 450-500°F. Place the pot in the oven at least 30 minutes prior to baking to preheat. Once the dough has more than doubled in volume, remove the pot from the oven and place the dough in the pot seam side up. Cover with the lid and bake 30 minutes Then remove the lid and bake 15-30 minutes uncovered, until the loaf is nicely browned.

Tuesday, December 9, 2008

#37 - Inside-Out German Chocolate Cake

what it looks like on the inside.


finshed cake, i didn't let it firm up, so it's melting.

after it's been cut into.


before it was frosted.

This was so good, I had to post 4 photos. My cousin Michelle first told me about this recipe. And since Pepe's favorite cake is German Chocolate, I decide to make this for his birthday last year. It took a long time and I didn't let it cool, so it was sort of a gooey mess, but the filling, was oh so good!

Here's the recipe from my friend Martha:

Inside-Out German Chocolate Cake

Makes one 9-inch torte.
10 tablespoons (1 1/4 sticks) unsalted butter, plus more for pans
7 ounces bittersweet chocolate
1 1/4 cups all-purpose flour
1/4 teaspoon table salt
1 cup sugar
2 large eggs
2 teaspoons pure vanilla extract
Coconut-Pecan Filling (see below)
Chocolate Ganache (see below)

DIRECTIONS
1. Preheat oven to 350 degrees. Butter two 9-inch springform pans. Line the bottoms with parchment paper, and butter the paper; set aside. Place chocolate and butter in a heatproof bowl, and set over a pan of barely simmering water. Stir occasionally until melted; set aside.
2. Sift together flour and salt; set aside. Place sugar and eggs in the bowl of an electric mixer fitted with the paddle attachment, and beat until fluffy and well combined, 3 to 5 minutes. Add vanilla and chocolate mixture, and stir to combine. Add dry ingredients, and stir to combine. Divide batter between the two pans using an offset spatula to distribute batter evenly, and smooth the layers. Bake until the center is set, about 20 minutes. Transfer pans to a wire rack to cool completely before unmolding.
3. Place one layer on a 9-inch cardboard cake round. Spread filling over the layer, and invert the second layer onto the top, leaving the smooth side up. Press down gently on top layer to evenly distribute filling to edges. Using a metal spatula, smooth filling flush with sides of cake. Refrigerate until ready to glaze.
4. Carefully transfer torte off cardboard round onto a wire rack set over a baking pan. Pour enough ganache glaze over cake to fully coat, shaking pan gently to help spread ganache if necessary. Let sit for 15 to 20 minutes. The ganache in the pan may be melted and strained through a fine sieve and added back to glaze. Pour remaining glaze over torte, allowing excess to drip off sides. If top is not smooth, gently shake pan or run an offset spatula quickly over surface. Allow to set at least 30 minutes before serving. Carefully slide the cake off of the wire rack and onto serving platter.

Coconut-Pecan Filling

Makes about 2 cups, enough for one 9-inch Torte.
1 fourteen-ounce sweetened condensed milk
10 tablespoons (1 1/4 stick) unsalted butter
1 teaspoon pure vanilla extract
4 large egg yolks
2 cups shredded sweetened coconut
1 1/2 cups finely chopped pecans

Directions
1. Place milk, butter, and vanilla in a medium saucepan, and cook over medium-low heat, stirring occasionally, until melted and combined.
2. Whisk egg yolks in a medium bowl, and, whisking constantly, add some of the hot milk mixture to the egg yolks until combined. Whisk the mixture back into the saucepan, and cook, stirring constantly with a wooden spoon, until the mixture thickens slightly, about 5 minutes.
3. Remove from heat, and stir in coconut and pecans. Cool completely, and refrigerate in an airtight container until ready to use, up to 2 days. This is so good, I could just eat this.

Chocolate Ganache

Ingredients
1 pound bittersweet or semisweet chocolate (I think semi-sweet is better, even milk would be good)
2 1/2 cups heavy cream

Directions
Chop chocolate finely using a serrated knife; place in a large heat-proof bowl.
Bring cream to a boil over medium-high heat; pour directly over chopped chocolate. Allow to sit 10 minutes. Use a rubber spatula to gently stir chocolate and cream until well combined and smooth. Let sit at room temperature until cooled and just thickened, stirring occasionally, about 30 minutes, but up to an hour depending on the temperature of the room.

Friday, November 28, 2008

#29 - Five Guys

We've gone here twice over the Thanksgiving Holiday. Once with my sibs, Kar Bucket & BT and today with Lauren and Matt (my cousins).

Today's order:
grilled cheese with pickles, tomatoes, fried onions, sauteed mushrooms and green peppers

large fry (shared between the 4 of us)
,
today's fries were from Sugar City, ID

cup for water

Monday, November 10, 2008

#14 - Football in the Fall

Last weekend, Pepe, Baby O and I went to my cousin Matt's football game at SVU (Southern Virgina University). It was probably one of the most exciting games I've seen, they won in overtime. And we even saw this guy there.

Afterwards, we ate at Frank's for the Memories (don't you just love that name for a resturaunt), took us on a tour of SVU and then went off roading at the site of the new football fields.
Related Posts with Thumbnails